
The inspiration for this fun mini project originally came from a Pinterest post I found a few weeks ago which looked like this.

Source: re-nest.com via Samantha on Pinterest
I’ve always had a thing about word ornaments around a house or a wedding, or well, just about anywhere, and these looked so darned simple but cute that I couldn’t help myself but want to have a go and make my own.
The only real hurdle in the whole process was strangely, finding wire. Who knew wire is so difficult to find! My first idea was to use a metal coat hanger. I was pretty sure they were everywhere. In fact, I clearly remember them hooking onto each other in my childhood wardrobe and forming slightly scary and pointy tangled messes on the floor which if you tried to untangle them could ping and scratch you with their sharp bits! (Although it is possible no one else had this experience and my wire coat hangers had it out to get me). I’m also pretty sure they were readily available for using in costumes, Christmas decorations, blue peter projects. Heck, they were everywhere! So why is it that just as I needed them for my lovely wordy wire project, there was not a wire coat hanger to be found anywhere. Literally, my wire coat hanger cupboard was bare. I even asked friends and family and they didn’t have any either (although everyone was just as surprised as me at their disappearance!!).
So, frustrated by my lack of wire coat hangers, I thought I’d try finding wire at B&Q or Homebase. Nope, they didn’t have anything. The only product even close to coat hanger wire is garden wire, but this was much too thin and flimsy. I even looked online for wire but all I could find was electrical wire which seemed to have a copper base and was wwwwaaaayyy to expensive for my little word project.
In truth, lack of wire sort of put a damper on my enthusiasm for the project and I let it sit for a few weeks while I grumbled about my lack of wire. Then, one weekend we headed out to Hobby craft (we needed some foam core board for a totally separate project, soon to be revealed!) when ‘TAH –DAHHHHHH!’, there, sitting right in hobby craft all along was the perfect wire! It was little bit more expensive than I had anticipated at around £6 for a reel, but the reel has way more wire on it than I needed and I’m pretty sure it will come in handy for other projects. (Well, that was the story I used to convince Phil to let me tuck it in our shopping basket). The wire was sold as flower arranging wire, so it may be available in other places which sell products for florists.
After I found the wire the rest of the project was a cinch. I picked up a ball of super cheap wool when I was in John Lewis later in the week (around £1.90), and we had all the rest of the equipment in the house. So here it is, this is everything you’ll need.

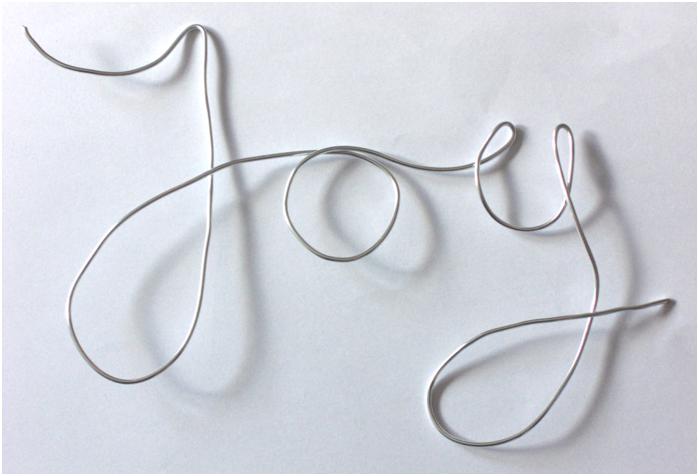
The first step was to decide which word you wanted to make, although, you totally don’t need to limit yourself to a word. It could be any picture or design, as long as its written/drawn with a single line so you can bend one piece of wire to make the shape. I decided to go with a bit of a Christmas theme as I picked up cream wool so I picked the word ‘Joy’. The plan is to have ones which say Peace and Noel etc to make a cute little seasonal set for decorating the house this year.
Then I drew out my word on a piece of A4 paper in cursive using a single pen line. This served two purposes. 1) To get the right size and style of writing and make sure my letters were in a good proportion (and I’d spelled it right) 2) To then use this piece of paper as a rough template for following when I was bending my wire. You could also totally find a cursive internet font and print it out the right size if you’re a bit handwriting challenged.

Then you need to bend your wire into the shape of your template (you could also just go free hand and skip the template altogether if you’re a bit more of a free spirit lol). The wire I bought was easy to bend so I didn’t really need any pliers to shape it, apart from in areas where I hit a really tight bend and I used the pliers to make the curve nice and tidy (when I tried to do it without the pliers my wire went a bit wiggly and just looked less tidy when I’d finished).
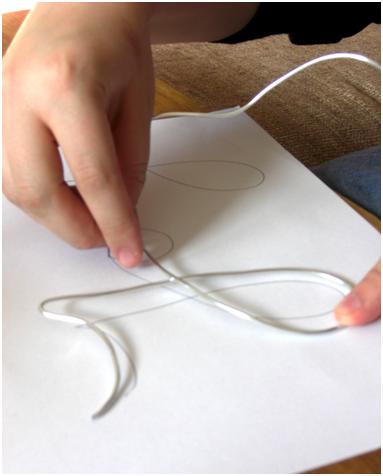

Then I snipped the wire where my word finished, and there you have it, the wire skeleton of my word, ready to wrap with wool. In total it probably took me about 10 minutes to bend the wire into shape,maybe not even that long. Easy.
Wrapping was also pretty simple. I actually wrapped the wool twice. Once with a base layer and then again with another top layer of wool. This sort of helped it to look more woolly and snugly.
To start the wool off and secure the first end, I ran the starting tail along the wire a little bit and wrapped over it so that it was nice and tidy and fixed. Then I carried on wrapping round and round all the way along the piece of wire, ignoring any of the junctions (e.g. where the tail of the Y’s curls round and cross the downward part of the letter – ignore those for now and just keep wrapping the first wrap). I took my time and made sure the wrap was nice and close and tight.


After you’ve wrapped it once it should look something a bit like this.

Then I set too wrapping my second layer working backwards over the first layer I had made, again taking my time to keep it nice and even and tightly wrapped. This time when I got to a junction I wrapped the wool a few times in each direction (over, under and round) the junction to bind the two pieces of wire together. This also made a huge difference to how stable the whole piece felt.

About half way along my second wrap my piece of wool ran out, so I took a thick wool needle and threaded my wool end back under the layers of wrap for about an inch, just to secure it. (Helpful hint: I had wrapped so tightly that the needle was a little tough to pull under the layers so I used the pliers to pull the needle out of the other end and this helped a lot). I also did the same at the end when I had finished wrapping to finish it up nice and neatly.

And here it is finished! In total with the wrapping and the wire bending I think it probably took me around an hour, but a more complicated pattern or longer word might take more time. It’s definitely something I would do with a cup of tea and a movie, and didn’t really take much thinking. Its nice to sit there and just wrap wrap wrap.

In the end I was so pleased with the results I made a couple of others, one for some of our friends Clair and Nick, and I also used some coloured thread to accent the heart section of the wool. Again, exactly the same process, just wrapping the thread and threading it under to wool when I finished to keep it tidy. Really the sky’s the limit, you could use any patterns, any colours.

So there you have it, a fun quick ‘joyous’ pinspiration project for a rainy afternoon.
p.s. If you have no idea what Pinterest is, oh my goodness!!!! I will post about it soon, but please please check it out. Trust me, pinterest will change your life, and if it doesn’t change it, it will certainly pass many happy hours of it. Go on, check it out now ……. go on www.pinterest.com


Pingback: Make: Spooky Halloween Treats by Mail | cookquiltmakeandbake